Leyland Owner - Gosford region of NSW |
|
Birmingham Motor Company
Jason Birmingham
Author of the 'Leyland Legends' a series of stories about "A Silly Man and his Silly Car"

Jason talking to South Australian member 'Andrew' and Western Australia member 'James' at the National meeting at Easter 2004 on the Gold Coast Queensland
Letter to the Classic Car Club NSW
- Monday, January 13, 2003
- Leyland P-76 Classic Car Club
- Dear Joe
- Hi , my name is Jason Birmingham & I am the guy that rang you recently for some advice about a P-76 in Qld that was for sale.
- Well, I bought it! This is my first P76 so I am going blind but for your advice. It seems like a good one though.
- It is a September 73 V8 super, Crystal white with a champagne coloured trim.
- True to the previous owners word it has only 37,000 miles on it the old guy that I bought it from (hes 82) now lives in Beenleigh, which is just south of Brisbane.
- He used to live & work in a place called Gyra which I believe is close to Maitland in NSW. He purchased it new in Oct 73 (he gave me the original purchase receipt ) & used it infrequently in his business which was as a stock & station agent as well as being agents for many other businesses. He also had a Holden ute at the time & this vehicle did the lion share of the work (no pun intended!!)as the roads were very poor & mainly unsealed, so he only used the P76 when he had to carry additional passengers. Around 1982 he decided to buy his wife a new Honda Accord & was to trade the P76 in on that vehicle.
- The Honda dealers offered him next to nothing for the P76, so he decided to keep it, buy a caravan & tow it with the big Ley.
- He put a towbar & air shocks on the P76 (the biggest, ugliest towbar that I have ever seen!!!) & hitched the new van on the back & drove to Bundaberg.
- They hated caravanning, so they sold the van & the P76 hung around in his shed till 1984.
- Rego came up in October, 1984 so he handed the plates in (I have the receipt from the RTA),put it up on blocks in the machinery shed where it stayed until 18 moths ago. His wife died & he moved to the retirement home in Beenleigh.
- He freighted the P76 up to Beenleigh & it stayed in a friends garage in the village. My first sight of the Car was in the December Just Cars magazine.
- It was advertised for $6,000. I called him straight away & we had a bit of a talk. A chap named Adrian from the Qld P76 club had been to look at the Car & took plenty of photos which he put on the Qld P76 website, so at least I could see in colour what the Car looked like. Adrian also gave me a pretty accurate description on what it was really like, as the old guy described it as in perfect condition.
- Well it wasnt in perfect condition in my books, but it was an original Car in good shape for its age.
- I told the old guy (his name is Ron) that I could only afford $5,000 (the truth) & he accepted this subject to my personal inspection.
- So the following Friday I left Gosford station (I live on the Central Coast) at 5.29 am to catch an 8.00 am plane to Brisbane, once there I hopped on an airport shuttle & was at Rons doorstep at 9.30am Brisbane time (10.30 am Our time).
- Ron had tea & sandwiches made & we talked about the Car for ages. Anyway I bought the Car, organised an unregistered vehicle permit in Qld & drove the P76 home that evening, arriving at home at 11.30pm The P76 went really well on the way home, the only drama I had was a leaking petrol tank when I filled the Car right up & a fuel gauge that is stuck on a 1/3.
- These two problems made it difficult to work out when I should put petrol in & how much petrol to put in so that it doesnt leak out everywhere.
- The 1st time I filled it (just outside of Beenleigh on the Gold coast to Brisbane expressway) I went in to pay & came out to see a lake of petrol coming from under the Car. My immediate thoughts were SHIT, what do I do.
- Being a mechanic for 22 years I was worried about rust in the petrol tank as condensation builds up on the top of the inside of the petrol tank & rusts it out.
- I wasnt expecting it to have rusted a hole in the tank, I was thinking it more likely to have shit in the fuel. Anyway I jumped in & drove straight onto the expressway & gave it a bit of a fang to get rid of some fuel, shitting myself that the whole thing was going to go up in flames at any moment, trying to rationalise that the leaking petrol wont burn unless there is a naked spark as the exhaust would not be hot enough to ignite the fuel.
- Anyway I stopped at the Gold coast & stuck my head under it & it wasnt leaking, so on I went. I figured I had about 70 litres on board (how much leaked out???) & that the Car would conservatively do about 15mpg (who knows what state of tune it was in ), so I pulled up at around 175 miles & thought I would put in 50 litres. Well at 38 litres it was pissing out on the ground again.
- So I was obviously wrong about 15mpg, so I thought I would run it for another 200 miles & then try for 45 litres. At 230 miles I went to put in 50 litres & it started to leak out at 44 litres so it was obviously doing an easy 20+ mpg. Other than the fuel problems, everything went really well. I sat on around 65-70 mph in most places (probably the reason for the good fuel consumption), was pulled over by the cops twice (no number plates) & marvelled at how comfortable the seats were.
- I drive a 2000 Holden Rodeo dual cab & a 2000 Chrysler Voyager & have owned many late model cars, but all of them after 3 or 4 hours sitting in them, you feel like a paraplegic when you get out, I cannot believe that this 30 year old dinosaur was more comfortable to drive that distance (referring to the seats) than anything else that I have owned. but its true.
- I drove alone, only stopping for food & toilets in one go from Brisbane to the Central coast without feeling like I had been hit by a bus. Impressive!!
- Anyway, my plans for the Car. I am going to sell my 2000 Holden rodeo Dual cab & use the P76 for my regular drive Car.
- Everyone I tell this to looks at me like I need some sort of help (probably do!!), but I have wanted a P76 since school (1980) & now I have got one & I intend to enjoy it.
- As soon as I got the Car back to work (I have my own mechanical workshop in Erina)
- I got Obriens to fit a tinted laminated screen. I hate the toughened glass that it had, as one rock & its over. I also wanted to check for rust under the screen (there was none!!!) & a new screen would get me a nice finish on the lower part of the screen covering the dash (it was all cracked & shitty looking).
- Next job is to tidy up the front nose panel as it has heaps of stone chips & the grille/headlight surrounds looks shitty. At the same time I will put in some H4 headlights that I have.
- Airconditioning & power steering are also high on the agenda so I ask you to keep an eye out for a wrecked executive that I can buy some bits from. Anyway, for now I will do a full service/tune & change all the fluids, check brakes & generally get to know the vehicle.
- It is pretty dirty underneath so I will stick it up on the hoist & give it a good pressure wash underneath & then paint & underseal it, as it probably has a billion stone chips & bare metal spots that I dont want to rust.
- Are you & the other members interested to hear of its progress?? If so I will write often so you can stick my letters in the newsletters when you get hard up for content !!!!
- Anyway, for now I will let the car sit in my workshop & I will tinker when I can, as I dont want to register it until march or thereabouts (too many other regos from june-dec.) Someone has told me about a P-76 gathering in Canberra early this year, & I want to be a part of this, so if you can let me know what this is about, that would be great.
|
Information and pictures
The following pictures and text was what was available to veiw on the web site when Ron was trying to sell the car.
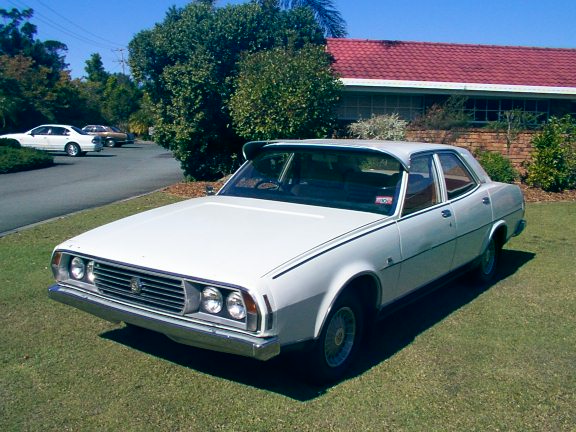
Manufactured in Sept 1973 - comes with weathershield, sunvisor and always garaged, towbar and with pump ups rear shockaborbers.
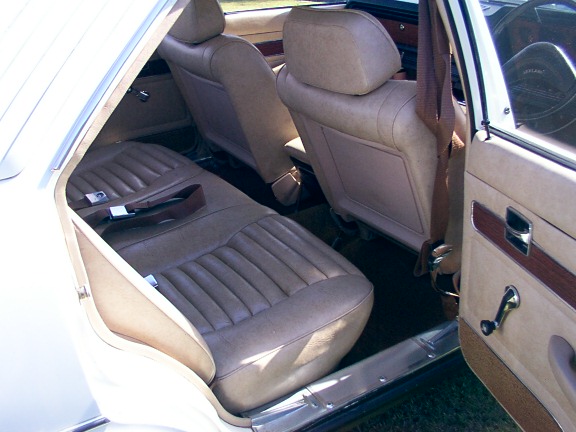
White with Champagne Interior. The front seats are recliner style.
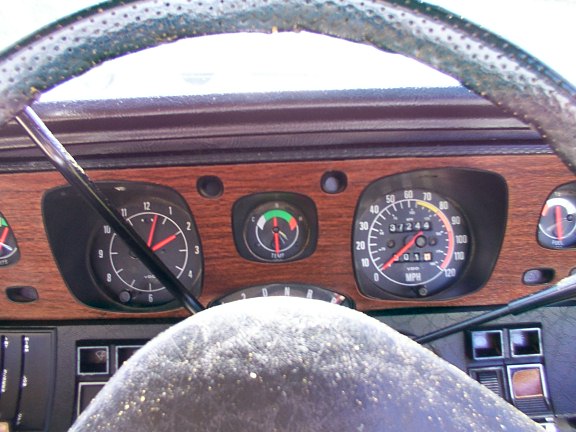
Column Automatic with speedo showing the origional 37244 Miles. The interior is spotless.
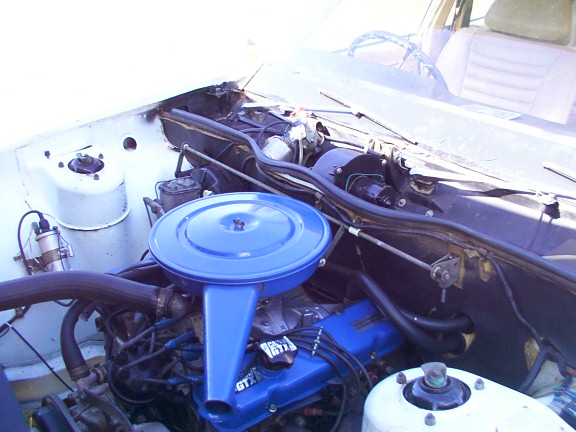
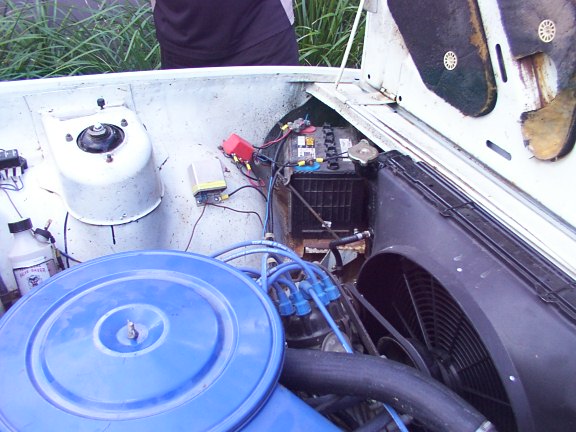
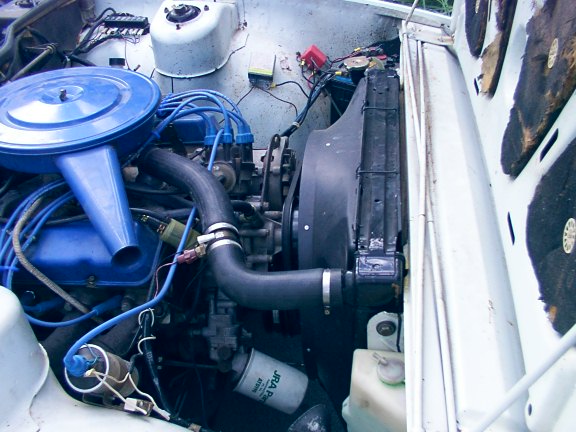
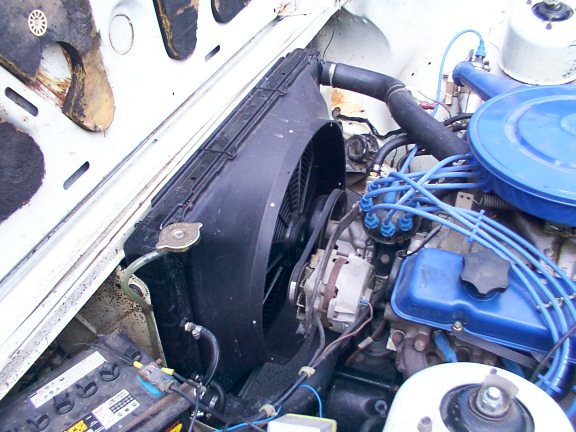
Engine bay
The car has been a Country vehicle, perfect order ready for registrations.Origional owner - Engine number 400003362
The tales of a silly man & his silly car......
From: Jason Birmingham
Part 2
- Date: Tue, 10 Jun 2003
- To All & sundry!!
- You P76 guys must be hard up for something to read as I am being pestered to give you an update on the ex Ron Bloxome super V8 & its progress in getting back on the road. Well sit down & grab a drink & read on!!
- I left you last time with a story about the purchase & trip from QLD to NSW of my latest acquisition, the above mentioned Super V8 column auto. Anyway, if you remember I was going to tidy it up & drive it around as a regular driver. As if!! I took the big Ley to my local panel beater & asked for advice on what to do. You see being a country car it had a billion stone chips, & I mean a BILLION!!!. Some of them were so big as to have dented the nose panel & front valance (the panel under the front bumper). There were also three smallish dents & a scrape on the LHF door, but absolutely no rust. The plan was to get the major stone chips & the dents fixed, & give it a buff all over . The problem was where do you stop. As you can probably guess, the big Ley got an outside respray, that is, the outside of the car only, not the inside of the doors & door jambs, inside of the boot or under the bonnet, only what you can see outside. Anyway, wanting to do it properly, it was my job to strip it down. Now I have taken apart plenty of jap cars, but I must say the P76 was a new experience. What a fiddly, dick of a job some of these things are!!!. All these clips & pop rivets & who was the bright spark who thought of those screen moulds!!! What a pain in the butt they are!!! And the door glass, well that is a new experience all together!! Honestly, you need to go to tech to get them out & in for the 1st time. Those bloody waist seals (the rubbers either side of the door glass in the door), what a job to try & get them off & keep them straight!!! Those stainless moulds down the sides of the car & the wheel arch moulds, I love how they throw in the little nuts & screw on clips every now & then, just to keep your attention. I dont know why they used them, they didnt go back on, I used the pop riveted plastic clips. The boot seal, I counted 65 little plastic clips holding that on, & none of them wanted to come out. Oh, & how about the headlight adjusters, what a top idea they are!! The rear screen had to come out as it had come unstuck along the bottom & as you will remember I had just had a new tinted laminated front screen fitted in the previous letter. When windscreens obrien fitted the new front screen, they stuffed most of the original screen mould clips (wonderful design that they are) so they used metal holden clips. Now I wasnt happy with the way the front screen moulds fitted as they were too high, so I thought I would get the Holden clips out & drag up a set of new Leyland clips from somewhere. The problem was that they eurethaned (glued) the Holden clips to the little rivets in the body, so they didnt want to move. Bright spark Jason thought I would cut/dig them out!! One cracked windscreen!!! I was REALLY happy, NOT!!!! (If any of you meet my missus, DO NOT say anything about the screen, as far as she knows its still the first screen) Anyway, I got the Leyland all stripped down & sent it to the panel beaters. They did a great job & had it back in a week. Some sort of record huh! It looked great, all shiny in its new coat of crystal white & gloss black on the lower bits. Unfortunately, they were too quick getting it done as I had not mentally recovered enough to start the re-assembly, & a fire might result if I started on it too soon!! So it sat in the garage for a couple of weeks while I cleaned up stuff & tracked down some bits.
- I got the upper & lower side mould clips from Scotts in VIC. The screen mould clips was a funny situation. I was over at the panel beaters sussing out how they were going with my baby (bloody big baby!!!) & I happened to have a screen mould clip in my pocket. When I pulled my keys out of my pocket to leave, the screen mould clip fell out. I said to the panel beater have you seen any of these thinking they may be the same as something else, & he said, come with me. He led me to an old ice cream container down the back of the shop & said have a look in here . I left with both my pockets bulging!!! Still dont know wether they are the same as anything else, but who cares!! I got the little rubber bumpers for the front doors, the rubber caps for the boot & bonnet adjusters, a new RHF door seal & new little eyelet thingys that go around the door lock buttons. The front of the car had copped a pizzling from stone chips & looked pretty tatty. the upper & lower nose panel moulds were dented, & I was lucky enough to find a pair of really good used ones. While I am talking about them, another whinge! How hard are they to get back on! After much stress, this is how I done it. I gently spread the mould with circlip pliers & fitted the stupid plastic clip in place. I then offered it up to the nose panel to make sure its in the right spot. When I am sure the clip position is ok, I slip a red electrical connector behind it to support the back of the clip so when you bang it into place on the nose panel, the clip doesnt just fall back into the mould. You repeat this procedure on all the clips on both upper & lower moulds. After this, I pulled the door locks & window mechanisms out & washed them up & re-lubricated them. I also washed out the inside of the doors as everything was full of dirt. I was really happy with the results as the inside of the doors came up clean & white, no signs of anything like rust. I had the carpets & seats out so I washed out inside the car as well . I pulled up the little bits of tape on the inner parts of the sill panel, gaining access to the sill. I then made a small drain hole in the lower rear of the sill & washed out all the dirt that had built up inside the sills. The bottoms of the front guards were built up with dirt up to the lower stainless strip. I drilled out the spot welds that secure the rear lower part of the guard to the sill & unbolted the rear of the guard from the hinge pillar. That allowed me to lift the lower/rear part of the guard away & get all the dirt & stuff out. I was lucky the car was shedded for 19 years as all that dirt would have gotten damp & rusted the panels away, as it was, it was just dry dirt!. There was minor surface rust there but I washed it all down & painted it with POR15 rust paint before bolting it back together again. I didnt spot weld the guard back on at the sill, just bolted it as I didnt want to burn off my paint & give moisture a place to start rust. I done this part before the car went to the panel beaters just in case I chipped or scratched anything doing it (I did). Also, before I took it apart, I put the car on the hoist at work & using a mild chemical cleaner & a hot water pressure washer, I cleaned the entire underside of the car. It was filthy!! Dirt, dirt & more dirt, but no rust!! Anyway, after all this cleaning I squirted 4 litres of amber coloured rustproofing into every hole, panel & crevice I could find. I was fortunate enough to have the proper rustproofing gun with the metre long attachments with little sprinkler things on the end so that the stuff went everywhere. It still drips on a hot day! The drivers door glass had only 1 stick on guide thingo & was a little scratched, so I thought the easiest way around that would be to get another door glass. unfortunately all the door glasses I looked at were scratched worse than mine. So I ended up buying another door glass just for the stick on things (the one remaining on the original glass had quite a bit of sideways movement). ever tried to get them off!! I ended up using three single edged razor blades spread around the radius of the guide thingo (what is its name??) & tapped then in towards the centre with a hammer & small screwdriver on the backs of the blades, sort of like a really sharp scraper/chisel. After getting them all off & cleaning everything up, I taped together a few pieces of newspaper & made a template off the LHF door glass to give me the positions to re-stick them on. Incidentally, I stuck them on with the same eurethane they use to stick the windscreens in with. It certainly held those Holden screen mould clips in place!! After much swearing & blood loss, the doors & windows were back together again. I fitted central locking as well because my kids never lock the bloody doors behind them when they get out. I adjusted all the door lock linkages to take out most of the slack (too much as you will later see) & ditched the big heavy springs that go from the inside of the exterior handle to the intrusion bar. I cant see a reason for them other than to make the handle harder to lift up & to take more skin off trying to fit them. The doors now open & close beautifully. I stuck some self adhesive sound deadener stuff to the inside of the door skins so they sound really nice when they close!! (dont stress, the deadener stuff wont hold moisture & I didnt put it all the way to the bottom of the door). I got a new carpet set made by tru-fit carpets in VIC & also bought some of their u beaut sound deadener underfelt. This is two layers of underfelt with some sound deadener/bitumen type stuff stuck between them. They reckon its great but I really didnt know how noisy the car was before so I cant give you a valid opinion. Its tough to cut though!!. The seats got a really good scrub while they were out & they came up like new , 100%, really happy with them. The Pirelli webbing had come un clipped on two of the cross pieces on each seat. The spring clip thing (there are alot of things in this car!!) that holds the strap into the frame must not be bent quite right as they didnt want to stay clipped into the frame tried to shove them through & then bend them, but it must be made of spring steel & wont play. The old red electrical connector came into use again!! I will explain which type I used as I have never found them good for anything else!! They are the type that is supposed to be used to join two pieces of wire together. You know, you shove a wire in each end, squeeze the hell out of it & squash it right up, tug on the ends of the wire & it comes straight out of the connector!!. You get the S---Ts with it so you throw it away & solder the wires. Well now I have two uses for them!! One was on the above mentioned nose panel moulds, (leaving the red insulating part in place) the other is to hold those Pirelli webbing clips into the frame. This time you put the red insulator part on the grinder & grind the side of the red stuff off (try not to grind your fingers, it hurts!!), leaving you with the little crimpy doover (not a thing)!! You then put the springy bit through the frame & get someone to hold it there & you crimp the above mentioned crimpy doover onto it & whalah!! Its stays there!!. Its still there even with my fat arse on it for some time. Another tip to amuse & amaze!. As I said, I had new carpets made because mine had faded to an almost orange like colour , the new ones looked great. The bottom of the door trims did not. How do I colour the carpet on the bottom of the door trims? After experimenting on the old car carpet with various paints & dyes, would you believe mid tan boot polish worked into the carpet, matched the new carpet perfectly.!! Still looks good too. I changed all the door trim clips to a Toyota type that has a plastic socket that fits into the door frame & a metal part on the trim card. Doesnt kill the door card everytime you want to get them off. Anyway, thats the doors. Oh no, forgot something. The waist seals (the door glass scrapers on the inside & outside of the door glass). The drivers door had a weathershield & the clips had stuffed the outer waist seal. I got a metre length of the stuff from Scotts in Melbourne. I also got some clips to hold it on. these waist seals have a steel centre strip running through it to give it strength, & the clips have to go through this steel centre. after much frigging around, the best way that I found was to position the clips on the seal & mark where you want the little tangs to go through. Stick the seal onto a block of hardwood & use a sharpened flat screwdriver (small one) to punch a slot through it. Then you can shove the whole clip/seal in the vice & bend the little tags over. The only thing that I wasnt happy about was the length of the little rubber flap that touches the glass. Its too long & applies too much pressure to the glass & makes the window stiffer to wind up & down ( as if their not tight enough!!)
- I bead blasted the headlight surrounds & primered them. The grille got paint stripped back to chrome. I then panted the top & bottoms of the grille & the headlight surrounds with some wheel silver paint that I got from Autopro, (looks about the right colour) After they had dried for a week or so, I then carefully masked up the grille & headlight surrounds & painted them matt black. With the grille, if you have a look at it, it has chrome on top & matt black in the recesses. what I did was paint the whole grille black & then scrape/cut the paint of the raised chrome surface with a single edged razor blade. Time consuming but its looks like new!! The Leyland grille badge & the L-e-y-l-a-n-d letters on the bootlid got the same treatment. With the front indicators, I pulled the backing/light globe holder off & washed the lights out. They were original Lucas items & the amber had faded a little, so gave them two coats with amber lens dye & they look like new again. I then siliconed the backs back on & painted the raised sections that were chromed (& mostly worn off) with a metallic silver paint pen. the rear lights got a good bath & the recesses in the light touched up with a fine point black paint pen. New Hella H4 inner & outer headlights with their own relay & wiring completed the front. The bumpers got a good clean & I painted the back of them with POR15 rust paint as they were starting to rust. I had the rear screen tinted before it went back in, so I could tint right to 20mm from the edges, as that would be difficult/impossible to do with the screen in place as the interior trim is up against the glass. With the tinting, I got the lightest possible shade of bronze tint available. Bronze because it is a 70s tint colour & it matches the tan/brown interior, & I chose the lightest shade so that the car still looks factory. It still cuts out 90%+ UV rays, so my back seat & parcel shelf is safe without an ugly louvre. Obriens glass fitted the front & rear screens & I was not happy with the result. I got them to glue the screens in & put the clips on, but not the screen moulds as I didnt trust them to fit them properly & not dent them. After the Eurethane had gone off I flooded the cavity between the screen & the body with rustproofing & tried to fit the moulds. Seems Obriens used too much eurethane when gluing the screens in & the glass was too high off the body to fit the moulds onto the clips. ARRGH!!! After much struggling & swearing, I managed to clip/glue all the front & rear screen moulds on, though I am not to happy with the fit of the lower /rear screen mould, it will have to do!! After a thorough tidy up of inside, I took it to the workshop for some new struts & shocks (Pedders) & new tyres + a blue slip. It sailed through the blue slip with no problems & the P76 was registered again for the first time in 20 years!!
- Now with all this work taking place, the plan was to get the car ready for the national met in Canberra at Easter time. After much stressing & hard work I completed the assembly of the car on Good Friday at 7pm. Now if you remember, we were supposed to be there for registration by 4pm!! Oh well ! The next part is a bit embarrassing, but I hope we have all done some silly things that we are embarrassed about at some times in our lives. As you will remember, in Sydney over Easter it rained & rained & rained , time was running out for me to get the car finished & I was going at it flat out. Well, when I was adjusting the inner & outer door lock linkages, I adjusted nearly all of the slack out of them, so that they opened easily & with only a small movement of the handles. Well, everything worked great until I put the door trims & the metal finishing trim around the inner door release on. Now I didnt know that I had created a problem until about 10:45pm at the shell service station at Merulan on the way to Canberra. I filled up with petrol & locked the doors & went in to pay. When I came out & went to unlock, I found I couldnt turn the keys in the door locks!! Both front doors were the same!!! Oh no!!! I was tired & cranky, but after a bit of a think I realised that I had adjusted too much slack out of the inner door release linkage. You see when you put the inner door release metal finishing piece in place, it lifts the door release ever so slightly, using up the little bit of slack in the linkage & stopping me from unlocking the doors, sort of like trying to unlock the doors whilst holding the handle up!! Anyway I was locked out!! What do I do??? After a bit of thought, I realised I could go in through the boot & the back seat. I unbolted the backrest part from inside the boot & pushed it in to the interior. I was then able to crawl through & unlock the back doors & pull the front door trims off & fix my stuff up!! I arrived at my motel at 1:15am on Easter Saturday!!
|
The tales of a silly man & his silly car......
From: Jason Birmingham
Part 3
- Date: Sat, 26 Jul 2003
-
- Hi everyone, the next installment in the on going saga of my white super V8 continues. I realize that for a lot of you out there, what I write about is old news re-hashed, but I am new to the Leyland Empire & I find these cars interesting & very pleasurable.
- Anyway, where was I?
- I just got back from the Canberra nationals, the first big run since I got the big rig registered. Well it went pretty well. Wind noise at expressway speeds was the biggest drama, really annoying. I bent the driver's doorframe in slightly at Merulan (when I locked myself out of the car!!!) & this helped lightly, but wind noise, clunks & rattles are something I hate.
- People say "but it's an old car, that's the way they are", bullshit!!!.
- Attention to detail, & fixing the "little things" is what finishes the car off. Have any of you seen a really nice looking car & thought WOW!! That's terrific, but sometime later you get a ride in it, or even drive it, & you think, what a piece of rubbish!
- It's a lot of little things that add up to a less than perfect job. Speaking of less than perfect, does anyone know what the story is with the front door bailey channels??
- Well, you know where the bailey channel changes from vertical to horizontal at the top/rear of the door, they have to cut a "vee" in the rubber so that it can change direction. Now both my front door baileys have "vee" cut outs in them on the LEADING edge at the top of the doors as well!!!
- The only purpose for this that I can see is to increase wind noise & drive me mad.
- If I put the garden hose onto the glass, water would piss in from these cutouts.
- Now I thought that these cut outs were unique to my car, but I have seen others with them. I wonder who the rocket scientist was who thought of that idea; maybe he was a Ford fan!
- Anyway, I shot down to Clark Rubber & pulled out my bailey channel & compared it to the heaps of different ones that they had there.
- When I was in Canberra, I was talking to someone (Don't know who!!) & they used to work at a Leyland dealership in P76 time. He told me they used to pack the bailey channel down in the frame with cardboard to make the glass fit more snugly into the channel.
- Well I figured if I could buy a bailey channel with longer sides, that would do the same job. After stuffing around there for ages I found a style that I reckoned would be good & they had a couple of metres in stock!! I fitted it up to the drivers door at home & charged out onto the expressway, "Magic", I could now hear the passenger side door roaring its head off!!!, that's ok, I'll get more bailey channel.
- So I went back to Clark rubber to order some more, but the pimply headed wanker behind the counter had no idea what to do, or how to order it, even if he was interested (which he wasn't), so I got the number off the rubber & phoned "Scott's old auto rubber" in Vic & ordered some.
- Later on, I got onto the Internet, checked out their website/ P76 section & guess what, they have the same no. Listed for P76!! I could have saved a lot of time & agro & just looked there in the first place, I have a habit of doing things the hard way!!! But it all turned out ok, as the wind noise level is great, no great source of noise up to 90mph, another niggle fixed.
-
- The next was rattles. I've got a lot of rattles coming up through the steering column; it makes the car feel loose.
- If I stuck my head under the bonnet & grabbed the lower part of the steering column & moved it up & down, I could get slight movement, meaning the lower steering column bush wasn't happy.
- I also had slight movement in the steering column universal joint, only a little though, but not good enough. I located a new lower steering column bush & put this in & it removed all slack from the lower column.
- On close examination of the universal joint, I have found the yokes that hold the cross part of the joint in place had spread ever so slightly allowing the cross part to move from side to side.
- I shoved the uni joint in the vice & squeezed it up & whallah!! No more movement!! , Lets see how long it lasts.
- Driving the big Ley after this little bit of work was amazing. The car felt infinitely tighter & quieter, BIG difference.
- When I was in Canberra, I checked out other cars columns, some had no movement & others had heaps more than mine, I can only imagine the rattles they have over bumps & it was so easy to fix. Almost forgot another thing I did. A Targa/Force7 steering wheel. Huge difference!! My original wheel was perfect, no cracks, but it had that wonderfully designed sharp edge. Its not just the look of the wheel that is different, the Targa wheel is offset closer to you & a shade smaller, as well as being better looking & having a softer, round diameter rim. A very worthwhile change.
-
- The next thing I done was raise the front seats by 25mm. You see I am pretty short (5 ft7) & so is the wife (5ft 3) so the seating in the Leyland is a bit low for my liking. I took both front seats out & removed the seat runners. I then cut some 25mm square tubing to the same length as the seat runners. I drilled two 8mm holes in the same positions as the seat runner bolts. I then painted the square tubing matt black. The tubing then goes in between the runners & the seat frame, raising the seat.
- The hardest part of the whole job was making new bolts to bolt the seat to the runners. You see the bolts are 5/16" thread size but have a 7/16" spanner size head so the head fits into the runners. I could have put smaller diameter bolts through but I didn't fancy the seat coming adrift in an accident or when my fat arse breaks it!!
- So I got some 5/16" bolts & made the heads smaller to fit into the runners.
- Another small change that made a great deal of difference to drive, the car seems smaller & is
- definitely easier to drive.
-
- Dash lights were the next item for attention. When in Canberra, I scored new wiper & headlight switches off Andrew Kloot, so I figured it was time to pull the dash out & stuff them in. Earlier on, I had bought another clock so I could send it away for repairs as mine was out to lunch; so all these things were the next job.
- The dash illumination globes are all 2.2 watts, so I upped the anti to 4 watts, so with a dash dimmer that works I now have bright dash illumination!!! Cool.
- I then put new globes in the ashtray & glove box lights (not working) & with this great burst of enthusiasm I made the interior light work on all the doors (Too much rust roofing for the switches).
- While we are talking about wiring, I am glad I changed the headlight switch as it just fell to pieces when I pulled the plug off the back of it, too much current for the switch to handle I reckon. The headlights are now all relayed so the new switch is safe.
- There was also a multi pin plug in the RH kick panel that was not pushed together properly causing funny things to happen with various circuits & last but not least, when the boot lid is opened, the LH hinge had crushed the wiring, shorting the taillight wiring out.
- The harness just needed to be moved & secured a little bit more out of the way.
- You know, I am lucky sometimes, when I was in Canberra, I was going through Andrew Kloots stuff that he got from Fred Addison in Kiama, & I picked up a couple of exterior door waist seals (The seals that scrape the glass as you wind the windows up & down). We had no idea what seals they were (inner or outer) or for what doors, but I grabbed a couple & guess what, outers for LHF & RHF, just what I needed!!!! I wish my luck was that good at Lotto!!!!
- Anyway I am sick of writing for now, so I will send on this email to Adrian the computer head & he will forward it on to all you sicko's like me who read this junk!! But don't despair. There is PLENTY more to write about in this on going saga. In the next installment, I nearly set fire to it, the exhaust drives me mad, the transmission goes funny on me & a whole lot more, so stay tuned, this is just as exciting as an episode of Home & away Huh! but I am not as good looking as Hayley Smith!!!
-
- See Ya!!
|
The tales of a silly man & his silly car......
From: Jason Birmingham
Part 4
- 10 Oct 2003
- Hidey Ho Everyone!!
- The ravings about my white V8 super continue. Now, where was I?? Oh yes, I nearly burnt the bloody thing out. If you can remember last letter (who can forget!!)
- I was doing some wiring repairs around the car.
- One of these jobs involved repairing a wire in the RH kicks panel area, as the insulation was all shitty & bare wires were showing. Most people would just have wrapped some insulation tape around it & forgot about it, but not me!!
- Why do it the easy way when there must be a harder way. I reckoned that I would cut the wire & feed some heatshrink along its length & then solder the wires back together for a shit hot job. I didnt realize HOW shit hot I would get it.
- The solder job worked out tops but then I came to the heatshrink & thats when the fire started.
- I was using one of those gas BBQ lighters for the heat but I must have just touched on the under dash felty type insulation & up it went!! SHIT SHIT SHIT !!!! Looking back on it now, it was only the outer most furry bits burning, not deep down into the insulation but I tell you it scared shit out of me!!
- I had visions of my pride & joy burnt out, not happy Jan Anyway the fire traveled quickly from the drivers side under dash to the passenger side REALLY quickly, & I am upside down under the dash trying to pat it out with my bare hands.
- Luckily my car is a column shift so it has no front center console, so I could dive over the passenger side & try to pat it out over there.
- The only place it started to get a hold was above the glove box as I couldnt see there, but it seems the blisters & burns on my right hand were worth it as I managed to put it out, skin regrows, Leylands dont! Looking up under the dash now you cant see anything, so no harm done, but if you listen to anything that I rave on about, that underfelt stuff burns like mad, dont under estimate it.
- I have had other makes of cars & done equally stupid things & their silencing material didnt burn like this stuff, it was like it has metho soaked in it. Honestly, I can still see it burning now, so quick.
- I am glad there is none left anywhere else in the car.
- Now, while I am displaying my stupidity, I will tell you about the rear main seal. You wont believe that I am a mechanic of 23 years experience when I tell you this, how dumb!!.
- The Ley has been leaking oil ever since I got it, not much, but it was getting worse. I had done the rocker cover gaskets & cleaned it all down & traced the leaks to the fuel pump mating flange & the crankshaft rear main seal.
- I got Andrew Kloot from SA to get me some engine stuff & I picked them up at the recent Leyland Australia/ BMC heritage day at Granville RSL.
- Andrew & some others from interstate had been down to The big Shed in Kiama to bag a heap of new old stock & they timed it to come to the Granville day out as well. Anyway, (jeez I go on dont I ) I took the big Ley down to Granville & parked next to Garth Morris from Qld & his weapon & being morning the sun was shining from an angle
.. right under my car, showing all, my oil leak, how embarrassing!! I dont think anyone else noticed it but I did & figured it was time to do something.
- Next weekend was the Eastern Creek get together & the big Ley had a spot reserved on pit lane, cant have ANY oil leaks there!!
- So, during the week I ripped out the transmission & flex plate to gain access to the rear main oil seal. The seal was definitely leaking so I popped it out & chucked it.
- Enough was enough for tonight I thought, I will finish it on Saturday, no probs. Well I didnt count on yours truly stuffing up the new seal when fitting it!!
- What a dick Huh!! So I let down Joe Green & the Classic P76 club & wasnt able to go to eastern creek, I felt like a real heel.
- I honestly cant believe how useless I was!! I should sack myself, but then who would work on my car!! Time to give it a birthday (again).
- Off come the petrol pump, in went a new fuel pump kit & back on to the engine with silastic to take up the distortion in the mounting flange.
- The transmission pan came off & a new filter & band adjustment happened. Whilst the transmission was out & clear access was available to the transmission tunnel, some self adhesive sound insulation went on to the inside of the tunnel in my never ending quest for smoothness & quietness (more on that later).
- The old car had been drinking quite a bit of oil lately, getting worse in fact, where a trip to Sydney & back (200 klm) would take the sump from full to low.
- I had oil smoke on start up but none visible whilst driving, so there was some valve stem oil seal problems. Time to give that a go too.
- Compressed air into the cylinders & an overhead valve spring compressor revealed only 4 valve stem seals still on their valve guides.
- A new set of Gemini/200B seals on all valves, new plugs & points & a new fuel filter, & a few hours later the big rig was up & running again.
- The advance mechanism inside the distributor was a bit sluggish so I pulled up the base plate & had a poke around in there.
- Jeez these Lucas distributors are junk, the advance weights flop around on their shafts & what a dick of a way for the vacuum advance to work it will have to go soon, may be there is some sort of Bosch alternative.
- I cleaned down the underside of the car & even painted the tailshaft, hows that Huh!!. Luckily (for the car) I was rewarded with a sweet running no oil leaks Leyland that to date hasnt used any oil (even after a trip to Sydney & back ) Cool hey!
- Now I am again embarrassed to say that it is now time to do something with the brakes.
- Embarrassed because I have done nothing to them other than to see that there was some pads & linings left & no leaks.
- 30-year-old brakes, fluid, rubbers hoses etc. & I drive the bloody thing all over the place. I need shooting!.
- A couple of months back I went on a run down to the NSW Southern Highlands (between Mittagong & Canberra) with a heap of friends in Austin 1800s.
- The 1800s driving style certainly didnt stress the Big Ley, but the brake pedal was noticeably lower sometimes & I was 2 ,1/2 hours from home.
- Luckily, after a good bbq, the brake pedal returned to its normal position & stayed there all the way home, I guess it was the big Leys way of giving me a kick up the arse to do something.
- Firstly, off came the master cylinder & I wasnt expecting too much. You all probably know, but brake fluid absorbs moisture from the air, so H2o levels build up in the brake fluid, causing corrosion/rusting of the inside of the cylinders & a dramatic lowering of the boiling point of the brake fluid. I dont know what temp brake fluid boils at, but water boils at 100 deg c so in extreme cases, a not so hard run will result in boiling of that water in the brake fluid & a soft or no brake pedal.
- Back to the master cylinder, & a peek up its bum revealed all was shiny & smooth on the inside, how lucky, I wonder if it had anything to do with the Ley living its life in a dry, moisture free environment (out in the bush).
- There has to be something in it cause I have pulled apart cylinders from cars half its age & they look like Jenolan Caves inside!! Jam in a new cylinder kit & stick it back on the car & thats one part of the brakes done. Off came the front calipers & they came apart, same story there, so probs & a couple of caliper kits later & some of that tosser caliper paint (cant help myself!) they were done.
- The front discs got a run on the brake lathe & the wheel bearings re-packed, stick it all back together with some new Bendix pads + some new brake fluid & thats the front circuit done, no hassles at all, & there shouldnt be for someone with my experience as a mechanic, but sometimes I wonder about myself
- Lets talk about the exhaust. This is the bane of my existence.
- When I bought the Big Ley last year, the previous owner had put this wonderful looking stainless muffler & tailpipe on it, the likes that I had never seen before. He then proceeded to give it a pizzling over all sorts of dirt /rocky roads till in some sections it was quite flat & sounded like a Hoover Lark with a full dust bag, Shhhhhhhhhhhhhh when you gave it a bit.
- Now in the local paper at the time, this guy was advertising some P76 stuff & I went & had a look at what he had.
- One of the things was a complete stainless dual exhaust, from front to back, complete with sexy polished mufflers. He was an old dude & an engineer & had made the entire system himself using lead to bend the pipes & making his own stainless clamps etc etc etc.
- Anyway his wife reckoned the car turned too many heads (can that happen??) so the duals had to go. $120.00 & I reckoned that I had a bargain Hmmmm.
- I shoved them on before I went to Canberra for the Easter meet & they certainly had a note!! It was pretty cool going through the harbour tunnel & the Eastern distributor with the exhaust barking off the concrete walls, but they were a bit droney so I reckoned they needed some work. (The missus who is a cop unkindly thinks the Ley sounds like the police launch!!).
- The old guy had never fitted a balance pipe between the dual pipes so the exhaust blokes all reckoned that would calm things down. Nup!!! Droned worse, especially around 50Mph. Ok, Ill put a resonator in each of the engine pipes, quieter at idle & at full throttle but DRONE!!, jeez it still drives you out of the car at 50mph.
- Right, lets get serious, must be the stainless mufflers he chose, lets get em off & have a look, they were offset mufflers with no baffles, just the fiberglass stuff in them. Ill get a couple of real mufflers with baffles & well be cooking with gas Nup!!
- By this stage, my wallet was lighter by another $150.00 & countless hours cutting & welding & the results could best be described as average, I guess Ill never make it as an exhaust designer!! Ive got the shits with the exhaust, so it will have to stay like that for now.
- I am not sure why its still noisy, maybe its the stainless pipes resonate more (the mufflers are now mild steel) Its only a skinny minny system 2 inch, who knows, who cares Im over it! Its cost me a fortune the sexy stainless mufflers are gone & it sounds shit! Grrrrrrrr
.
- I just asked the missus what else I should write about who cares, this story is cancelled due to a lack of interest was her reply, she just doesnt get it!!
- When I arrived back from Qld when I first bought the big Ley, I can still remember my eldest daughter, looking at the Leyland out of my bedroom window & saying Dad, youre a freak!!!! I am NEVER getting in that car, its feral!!!
- Now, when I drop her off at school, the other kids say cool car, I love it!! Dad gets the last laugh!!
- There have been three separate occasions when going through maccas or Red Rooster drive through (I didnt get this fat from eating lite & easy) where you get to the pick up window, the kids there (both male & female) give me some complimentary remark (cool car, sick car, Looks good). They have probably seen it on their drive through camera & thought whats that? Leylands sure are an interactive driving experience!!
- Talk to you all later & have a P76 time
.. Anything but averageJason
|
The tales of a silly man & his silly car......
From: Jason Birmingham
Part 5
- Date: Thu, 6 May 2004
- Hi everyone,
- It's been ages since I have written anything about the big rig; so "sucked in" you're in for it now!
- I left you last time with a story about fixing the front brakes, now having spent a fair amount of time mucking around under the car, I decided it was time to give it a "bit of a lift".
- I had gotten some engine mounts from Andrew Kloot in SA so I figured it was about time to shove them in as the driver's side mounting was starting to crack.
- Now, power steering had been on my agenda for some time, so it was now or never. I got hold of Joe Green from the Classic Car Club & asked him to organize me a dead power steering rack that I could get reconditioned .
- I picked it up from Joe, took it home & delivered it to my local steering place for an overhaul.
- They rang the next day to say it was pretty sad & needed some "hard parts" that is, some of the bits inside that rarely wear out, if ever.
- Seems the rack had been sitting around for a while with the hose ports facing up, & water had gotten into the rack, rusting the bar & valve body. A phone call to Joe led me to "Dave Britton" who lives in the Sydney suburb of Picnic Point. Dave is an interesting character, who used to work for Bendix Australia, who later split & turned into TRW, the steering & suspension supplier to most locally made vehicles in Australia. Dave was involved in the development of the power steering rack for the P76 & later in the supply of reconditioned exchange racks for Leyland Australia Parts. Dave has heaps of old power racks for P76 hanging around & was able to sort out my problems in no time.
- Dave overhauled my rack & made some modifications to make it more reliable & serviceable. The only complaint that I had was that he didn't paint it!! Soon fixed that!!
- I needed a pump, brackets & pulleys next & once again Joe Green fixed me up there. Seems an ex club member was cleaning out his garage & had some motors, gearboxes & stuff to sell & was I interested?
- Can you ever have too much Leyland stuff?
- One of the motors that I got from the "garage sale" was complete with pump, brackets, pulleys etc. so I was sorted there.
- I took the pump to my local steering guy again for a re-seal & check over (I don't like doing things twice) & this time, it returned with no problems.
- I actually did all this ages ago & had the stuff hanging around waiting for an infusion of motivation, so when the mounts came up for replacement I decided that now was the time. The cross member was pretty daggy looking with a few dents & not much paint left, so I supported the engine & dropped the whole cross member out.
- Much painting & smoothing later the cross member was looking pretty good again. I painted all the lower control arms & filled the chassis rails with heaps of rust proofing, cleaned up/replaced bolts & washers with new ones & buffed up the sway bar links. I took the lower control arms out & painted them.
- I replaced the ball joint boots after making a groove in the ball joints to retain the boots & shoved all this stuff back in the car. The time had come to put the "new" power rack in & after a lot of swearing & pushing/shoving I got it bolted in place.
- It was a pretty tough job getting the rack mounts in with the little spacer/rubber doovers either side & then the bolts through all in one go by myself, but I got there in the end.
- The power steer pump & brackets went in easily after I worked out that someone had put the bottom hose on upside down (not me!!) & I hooked up the new pressure hose (Andrew Kloot in SA) & new return hoses.
-
- With all this work completed, it only leaves the intermediate shaft between the lower column & the steering rack to fix up. Now if you remember from my earlier stories, the "eyes" in the uni joint of the intermediate shaft had opened up slightly, allowing the cross shaft of the joint to move side to side ever so slightly.
- I had given the "eyes" a squeeze in the vice earlier on & that had tightened it up for a while, but a small amount of movement had returned, with a resulting slight rattle in the column sometimes.
- A new joint had to be organized. I had an old steering column shaft that I took with me to the wreckers with the thought of finding a late model car with a good uni joint that fitted the bottom of the Leyland column.
- I would then graft that uni joint on to the Leyland intermediate shaft & all would be well. Surprise surprise, that vehicle turned out to be a Hyundai Excell X3.
- That is the last model sold with the Excell name, before the Accent.
- Its intermediate shaft has a universal joint either end & one end fits the Leyland column perfectly. As an added bonus the shaft size is only .5mm different to the Leyland shaft, so it was a simple matter to make up a sleeve & join the whole lot together at the correct length for a power steered vehicle.
- Modern manufacturing techniques make for a tighter, smoother universal joint, which has eliminated all noises from my steering. Excellent result! I was in two minds about fitting power steering, as some people said its too light, terrible on the highway, no road feel etc etc, but I am very happy with the results.
- With the Force 7 steering wheel, the car is much more agile & easier to place on the road, with excellent highway manners.
-
- Next thing for attention was the radiator. My car had a new radiator core in it a short time before I bought it, but the temp gauge always hovered a little above 1/2 way, something I was not really comfortable with.
- I had changed the thermostat to one of these new "Tridon high flow " ones but the temp gauge still seemed to struggle to stay at or below 1/2 way. As I want to put air conditioning in at a later date, I reckoned that the radiator was not up to the job. I called Joe Green again, (jeez his name gets in here a lot this time!!) & he was able to organize this new huge radiator for me. This is a top piece of work. He has had his local radiator blokes modify a WB statesman V8 cross flow radiator.
- He has had the locating studs placed in the bottom of the radiator & the threaded sockets put in the side tanks, special necks for the hoses made & the whole thing bolts straight into the standard spot when you take out the filler piece on the drivers side.
- Perfect! This radiator has a heaps bigger capacity with more tubes per inch of radiator, another complete row of tubes + more fins per inch as well. An excellent conversion. The only problem was my transmission cooler lines needed to be modified as the new radiator is cross flow & of course the cooler is in the side tanks.
- What I done here was another trip to the wreckers & I pinched some 5/16" fuel pipe that runs under nearly every car on the road. It is an anodized type steel pipe that looks the same as the original Leyland cooler lines.
- I chose some pipe with the right bends in it (it is difficult to bend even with a pipe bender) & slipped a little sleeve over it & silver soldered it to the original Leyland cooler pipes. Looks as good as original!
-
- Next on the agenda was the cooling fan. I hate belt driven fans, as they are noisy & drag too much power out of the car, so an electric fan was decided on.
- I wanted it to look good under the bonnet, so I charged off to the local Holden dealer & bought a new fan shroud for a WB Holden V8 (which of course fitted the new radiator perfectly).
- I fitted the shroud upside down & trimmed it back a bit (It was a bit too deep). Inside the shroud I fitted a 16" electric fan (the biggest I could get).
- I made up a brass adapter that fits into the top hose so that it takes a Camry electric fan-cooling switch. I hate those electric fan switches that have the capillary that goes down inside the top hose.
- They look shit & always leak. Anyway, it was after all this work was done that I realized that the engine temperature was little changed.
- A thermometer in the water, backed up by this really great laser pointed infa-red thermometer reveals that the temp gauge is lying!!!! I tried two other temp senders with no change so I come to the conclusion that the gauge needs some help. Not having another one handy, I dropped the instrument cluster out & pulled the gauge apart. With the help of the above-mentioned thermometers I re-calibrated the gauge to read correctly, (a surprisingly easy job).
- Think about it, when the gauge was made, they had to be calibrated so why cant I?
- I had the car, accurate test equipment & the know how, it's been working perfectly ever since. Probably nothing wrong with the original radiator!! Anybody need a recently re-cored standard radiator for a P76? Going Cheap!!
-
- So it was off to the steering professionals for an accurate wheel alignment & everything is going really well.
-
- The Qld nationals was coming up so I spent days cleaning, polishing & waxing it. A new stereo went in & I added a remote to the central locking, so now we can lock & unlock with a press of a button, which also turns the interior light on, Cool huh!
- I am also adding an electric boot release so that I can lock the boot with the key, but can open it with the remote whenever I want to. I had to put an immobiliser in for insurance reasons, so I thought that I may as well go the whole hog!!, hence the remote & stuff.
- Its great with the kids, as they are used to late model cars, so they never lock their own doors.
-
- The trip to the Qld nationals went off without a hitch, save for 1 1/2 hours to get through Ballina. The big Ley returned 23.8mpg & 24.1mpg on the trip up, which I am really happy with.
- The old car really behaves itself well on the open road, with no troubles keeping up with more modern cars. People say the P76 drives as good as modern cars, while this simply isn't true, 30 years is 30 years & a lot of progress has been made with car design, but I reckon that they must have been truly impressive in 1973, as they are still a delightfully rewarding drive today.
- They are a big, roomy, comfortable car, that handles, steers & brakes like nothing else locally produced at the time, coupled with it's other attributes, the P76 really was a unique car then & still is today, Long live the Leyland!!
-
- Next on the list is the alternator. With this "Jim Dandy" electric cooling fan, & up rated H4 headlights, the original Lucas alternator is having a hernia trying to keep up.
- Bolted to one of the motors from the "garage sale" is a Bosch 60 something (too lazy to go to the garage & check exactly!) amp alternator. I will shove a new set of bearings & regulator/brush assembly, clean it up & stick it on to see how it goes.
- I know there are higher output alternators available, but they cost money & I already have this one & besides, it's got to be better than the old 35 amp Lucas job.
-
- Anyway, enough for now, are you still awake?? I will catch up with you all later.
- Take it easy & look after your cars, keep the feeling!!
- Regards, Jason
-
- PS: My Apologies for not writing about the Qld nationals, but personal problems cut short my stay in Qld, so I missed out on a lot of stuff. What I did experience was very pleasant & a warm thank you goes to the organizers & the Qld club for a great time.
|
The tales of a silly man & his silly car......
From: Jason Birmingham
Part 6
- Fri, 4th Nov 2004
- Hi everyone out there in Leyland Land
- This months drive concerns one of the years highlights for me, & that is the BMC\Leyland Australia Heritage day. To those of you who dont know what this is all about, its a day when interested past employees of BMC/LA get together & have a feed & a yak at Granville RSL club. Also invited, are sickos like me who live for these old bombs!!.
- We turn up at Granville RSL club & line our cars up (you see there are plenty more dills like me!) then we stand around & talk talk talk! A little later the bar opens up & I lubricate the gob & talk some more! Dinner comes around, banquet style, along with dessert, so there is some peace & quiet whilst I eat (still cant manage to talk AND eat at the same time!)
- Meanwhile, we get to listen to some of the ex employees & the stories they have about our fine old cars. After the oldies from Leyland have finished talking, I hunt some more people down & generally drive them mad as well!
- Mid afternoon, people generally have had their fill & drift away for the day, leaving me to look forward to next year.
- What I like about this day, apart from the old cars & the food, is the chance to catch up with members of other clubs with other types of BMC/Leyland vehicles.
- You see the P76 is not my only love when it comes to cars, as I have a soft spot for most of the BMC range, & its days like the heritage day when I get to see quite a few of their vehicles in one place.
- This year we only had 6 P76s & Joes Force 7 there, but there were quite a few other vehicles that caught my eye! The highlight of the day for me, was a 1973 Moke Quadra which is a factory 4wd prototype of which only 2 were built.
- The Moke was in restored condition, & was painted a dark green, possibly British Racing Green. It has a white hard top fitted & looked terrific.
- It sat a little higher than a standard moke & had red Quadra decals fitted to the areas below the bonnet & on the rear mudguards, which is the positions for the Californian decals when fitted. The rear suspension looked like it was from a Triumph Herald/Spitfire, as it had a transverse leaf spring & the diff bolted to that.
- The rear suspension uprights looked like Triumph stuff as well, but I am not 100% sure, but they were definitely not Moke. Drive to the rear diff came from a bevel gear arrangement on the front diff, through a simple dog clutch & was transmitted to the rear diff via a conventional drive shaft.
- The vehicle was fitted with a 1275cc engine (not a cooper s but from the Morris 1100 s), & other than the 4WD stuff, appears fairly standard. The only differences of note on the inside were the addition of a lever to engage the rear drive shaft. Of course there were no low range gears, but the mokes inherent lightweight & the torquey 1275cc engine would make for a very capable all road vehicle.
- You should of seen all these old fart engineers, eyes lit up, hands waving around as they are talking, obviously happy to see one of their cars back again.
- Some of them even got on the ground & pointed out various bits & pieces that were their ideas, it was terrific to watch!!.
- I didnt actually get to talk to the owner as he was in high demand on the day, but I overheard that he bought the Moke in the Trading Post!!
- It is great to see such significant vehicles restored & on display for the public to see, there should be more (are you listening Joe Green !!)
Among the Leylands there were a few other BMC vehicles.- 1. Austin Freeways, Both a Mark I & Mark II
- 2. Austin 24/80 sedan Mark II
- 3. Vanden Plas Princess 4.0 litre R
- 4. Austin Lancer (not sure what model, but it looked like a Morris Major Elite to me)
- 5. A MGB Mark II convertible (did you know many of these were built at Zetland as well)
- 6. Austin 7 65 special sports
- 7. Austin 7 Wasp
- 8. 4WD Mini Moke Quadra
- 9. Morris Mini Cooper
- 10.Morris Mini Cooper S Mk II
- 11.Morris Mini Deluxe
- 12.Austin Healy 3.0 Litre
- Altogether, it was a pretty good day, as even though we were a bit short on vehicles, there was a good turnout as far as people were concerned (150+).
- Hal Moloney was there as well & he was as enthusiastic & bubbly as ever. I really enjoy going to the heritage day, the cars, the people, the food & good conversation all amount to a good event.
- We might see you there next year huh!
- Jason Birmingham
- PS: Dont forget, get your cars out & DRIVE them. Keep them in peoples faces, dont let the good work these people did fade away. In years to come, all these old guys will be gone & the cars are what people will remember, its up to us to preserve the vehicles & keep the memories alive.
|


Click on the photos above to see them in full size!
The tales of a silly man & his silly car......
From: Jason Birmingham
Part 7
- Date: Wed, 8 Dec 2004
- Hi everyone out there in "Leyland Land"
- As a mechanic, owning a mechanical workshop, you get to see lots of strange things with cars. Earlier this year I had a fellow club members P76 V8 4 speed in to do some steering work & get it ready for rego (amongst other things) & immediately noticed that there was a terrible vibration in the engine.
- Now, it was awful!!!. At low revs (1500rpm) a low speed vibration went through the whole car, to
- the extent that if you had the door open, it would shake up & down in time with the vibration.
- The exterior sun visor would also do a "jiggle" as well! When you brought the revs up to 4000rpm the whole dash shuddered & the car was most unhappy.
- The first priority was to make the car safe & driveable & of course, getting the all important registration "pink slip", so the vibration was put in the "too hard basket".
- I had suspected something was wrong in the clutch/flywheel area, cause if you rested your foot on the clutch pedal whilst you were feeling these vibrations, the clutch pedal did a little dance in time with the vibration.
- The clutch also shuddered on take off, which is not all that unusual for the P76.
- Anyway, fast forward to now, & the Leyland has forced the issue, with the owner reporting a "filthy" noise from the bell housing area & the clutch now not dis-engaging properly, making gear
- shifting difficult.
- By the time the big rig got to me, the noise had gone, but the clutch woes remained. The "take up point" of the clutch was now right on the floor, so it was time to slip the gearbox out & have a poke around inside.
- Getting the box out of the Leyland is too easy, compared with modern cars.
- The rocker cover gaskets & engine rear seal have been seriously leaking.
- There was enough oil underneath the car to make the "Exxon Valdez" oil spill look like WD40 over spray!! With the box out & bell housing off, it all became clear. One of the pressure plate securing bolts had decided it was time for a holiday & parted company. The noise thatthe owner had heard was the bolt rattling around inside the bell housing.
- It had at one stage gotten jammed between the flywheel & the bottom of the bell housing, cracking the bottom of the alloy housing, before exiting via the clutch fork hole. The other two bolts holding the pressure plate to the flywheel (The P76, along with Holden's, Fords & Valliant's of that era only had 3 securing bolts) were also loose.
- The pressure plate was able to move around on the flywheel & the missing bolt had allowed the pressure platediaphragm to distort, it was all pretty ugly.
- My main concern was still with this engine vibration & I was hoping that the pressure plate "flopping around" was the answer.
- I took off the pressure plate & ran the engine with just the flywheel & it was much better, not perfect, but definitely improved, you probably wouldn't pick it if you weren't looking for it.
- I couldn't try it with the pressure plate on at that stage, as the thread in the flywheel for the offending bolt was stripped.
- I went to a trade night a while back, put on by the local clutch mob & Daiken clutch industries, & I remember Daiken, (who are an original equipment clutch supplier to many Japanese vehicles) giving PBR (who are an Australian Original equipment clutch supplier), a good ribbing about these "3 bolt" pressure plates.
- Their argument was that with a clutch of that diameter, 3 bolts are not adequate to provide even clamping of the pressure plate to the flywheel, resulting in distortion of the diaphragm (the big steel spring that clamps the whole "she-bang" together) & resulting in clutch shudder.
- Now seeing that there isn't a Jap car with a 3 bolt pressure plate & that on a whole, their clutches work beautifully, I reckon there might be some truth in what they say.
- Now, put that all on hold & we go to MY P76, & the fact that I will be changing my car to a 5-speed manual, but more about that in another issue.
- One of the things that I have had done was to convert the new clutch & flywheel that I will be using on my car to a 6 bolt pressure plate.
- I sent the new 3-bolt pressure plate & the machined & lightened V8 flywheel away to have the other three holes drilled in the flywheel in the correct spots, so that all the threaded holes are of equal distance apart.
- So I then bolted my 6-bolt pressure plate to his 3-bolt pressure plate, so as to provide a
- template to drill the holes in his pressure plate. After drilling the holes I then bolted it to his flywheel to provide a template to drill & tap the holes in the flywheel, phewww!! Lots of templates, lots of holes & lots of flywheels huh! But anyway, to make a long story shorter (not short, it's passed that now!) we now have a 6- bolt flywheel & pressure plate for the vibrating Leyland.
- Now I can hear the technical ones amongst you saying "why didn't you do all this to a new clutch?" well, the poor suffering club member had a new clutch fitted 18 months earlier & only done 10,000 odd kays since, so there was negligible wear on the unit.
- The only sus point about the assembly was the possible distortion of the pressure plate caused by the missing/loose bolts.
- When removing the pressure plate from the flywheel, you should always loosen the bolts evenly to avoid distorting (bending) of the pressure plate & when all this fell apart in the bell housing, that didn't happen, still I reckon it is worth the risk of using the old pressure plate to try & keep the costs down, as I am going to get rid of all that awful clutch linkage & use a commodore clutch cabled to get a "lighter, smoother" clutch pedal.
- Anyway, I banged the "modified" clutch assembly/flywheel back on to the engine & fired it up to check for the vibration, with mixed results.
- I don't know whether it's because I am trying to feel for a problem, but I still wasn't 100% happy with it.
- Leyland engines, when manufactured, were "dynamically balanced", which means they were spun up & balanced with different weight bolts that screw into the flywheel/flex plate at points around the circumference of the flywheel.
- The harmonic balancer at the front of the engine (front pulley) was also balanced. What I did next will probably raise a few eyebrows, but I tried the balancing bolt on the flywheel in a few different positions & in the end, achieved a pretty damn good result.
- So there we have it.
- A smooth engine & 6 bolt clutch. The next rave will be about the cable clutch modification, which Russell Nicholson's has done on his V8 5speed with really excellent results.
- While I am going on about cars & the strange things that happen, I had a 87 SV21 Camry come in on a hook the other day, dragged off the F3 expressway, wont go, no oil in the engine & the owner with a very sad look on his face.
- I didn't have to tell him that it didn't look good. After I knocked over the work I had to do for the day I gave the tired old Camry some attention. It cranked over, but had that "don't wanna, don't wanna," sound.
- The fact that the engine rotated was good, as no oil generally results in a seized engine. It sounded strange when cranking, like the camshaft timing belt had broken, so I pulled back the top cover & could see the belt rotating.
- My next thought was maybe a broken camshaft. Sometimes, the rear cam bearing seizes & the cam snaps in two, so I lifted the rocker cover to have a squiz in there, all ok!
- The one thing I did notice when I was in there, was that oil was getting to the top end, so whilst there was not enough oil to read on the dipstick, there must have been enough for the oil pump to pick it up.
- A quick check of the cam timing revealed that all was not well.
- A sticker on the plastic timing cover revealed that the cam belt had been changed 40,000klm/3 years ago, so it was unlikely that it had stripped, unless something had seized.
- Anyway, push it inside & up on the hoist, rip all the rubbish off it to get to the plastic timing covers & once I got them off, all was revealed. These plastic timing belt covers have a rubber gasket where they contact the engine block.
- The guy who had last done the timing belt, had not fitted these rubber gaskets properly, & they had gotten tangled up with the timing belt/gears, resulting in the belt jumping numerous teeth & the engine not running.
- The thing that makes me shake my head was that job was done in Jan 2001. Why did it wait till now to throw the towel in? Cars & Computers, they make you wonder huh!!
- So I fixed all that up, stuck it back together & fired it up.
- All good!! Tough car these Camry's!! The owner really needed shooting though.
- It hadn't had an oil change & filter for 2 years, the tyres were all bald/flat, it had NO brake lights& the air filter looked like a compost heap.
- When I drained the oil, it didn't cover the bottom of my oil drain tin, IE. less than a litre! I wonder if he realizes how lucky he is!
- Catch up with you next time!!
- Jason
|
The tales of a silly man & his silly car......
From: Jason Birmingham Part 8
- The worlds most boring man.
- Thats my new title at home! According to the wife, & Ive gotta say, that towards the end of this episode, I really felt like it. You see, I never do anything in halves & why give yourself enough time & cruise along, when you can stress out & work all night every night to achieve the same result!
- Now, if you were paying attention last article (I reckon youd be lucky to stay awake!) I had left myself 5 weeks to do the engine bay & re-register the big Leyland, ready for the muscle car day.
- Plenty of time huh? Ummmm
. Not quite! Lets start at the beginning (always a good place).
- All pretty boring, out came the engine, & into the trailer to take back to work for a freshen up.
- Next weekend involved stripping the engine bay of everything, & I mean everything.
- The crossmember & steering column stayed, but thats about it.
- Next was the time consuming part, lots of sanding & preparing to paint.
- The LHF skirt & battery tray area was the worst with lots of surface rust.
- Nothing dramatic, but this whole area went back to bare metal, as I didnt want any dramas down the track.
- I got my small sandblaster into the battery tray & the back of the LH headlight panel & made a huge mess in the driveway.
- The previous owner was keen on the drill, as over the years he had given the P76 a lot more holes in the under bonnet area than it left the factory with. A bit of time with the mig welder soon fixed them up & all in all it went pretty smoothly.
- Leyland Australia didnt lash out with paint in those days, it was barely enough to cover, & it looked like they painted the engine bay out in the paddock, as there were stacks of lumps & bumps mixed in with the paint, who cares, its under the bonnet I can hear them saying it now! Still, at least it wouldnt be hard to improve on!
- The old car really is a good one; rust is a 4-letter word to this car.
- Even the firewall drains & crevices were clean.
- I removed the firewall silencer pad (It was mostly falling off) & then cleaned off all the remaining glue that didnt stick anyway!
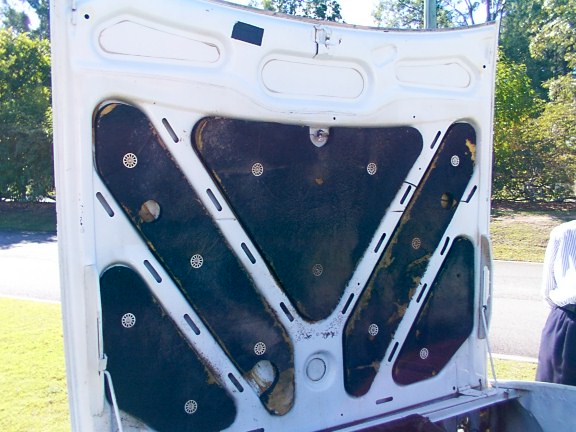
- The bonnet was off & upside down on a panel stand & I ditched all the underbonnet silencer pads as I had some new ones that I bought from the QLD club (they got them from Nigel Bray in SA who has re-made them).
- Same story with the paint on the underside of the bonnet, not very much & pretty shitty!
- Leyland must have painted the bonnets when they were fitted as the underside of the leading edge of the bonnet wasnt even painted!
- If you ever decide to take this engine bay painting job on, get yourselves some of these rubber backed sanding pads, made by 3M. They are about the same size as a green scouring pad, but only a few mm thick.
- The back is soft rubber (easy on the hands) & the other side is the sanding bit.
- They are great for irregular surfaces & as we all know, the P76 has plenty of these! The only down side is they are $2.20 each, but they do last a good while.
- After everything was sanded smooth, masking up the rest of the car was next.
- I went to the local crash supplies & bought this home-style Masking machine Its like thick glad wrap, on a roll, with masking tape on one edge.
- After you pull it out & stick it on, it then unfolds to about a 2 meter drop & the static electricity makes it cling to the body, really cool!
- It really saves heaps of time & does a good job, but its only useful for the outside panels, not the fiddly bits.
- I have never used 2 pack paints before as the health dangers & a lot of fairy stories have scared me off, but it really is great stuff, very forgiving, it hides lots of mistakes, dries really hard & gives a great gloss straight from the gun!
- The only real drama I had with it, is over spray. Because 2 pack sticks well & doesnt dry by evaporation of solvent like acrylic paint, (it uses a hardener) any over spray is a headache to get off.
- Perfect masking is critical, believe me, the shit gets everywhere! A proper face mask (not just those shit paper ones) & a complete covering of the skin are needed, as the paint contains a form of cyanide, which cant be to good for you!
- The paint is not supposed to be sold to the general public, but that really didnt present any problems.
- Anyway, stuff called Hifill was first, which is like a thick primer/undercoat, then spend more time sanding again.
- Then, a quick wipe down with wax & grease remover & on with the Crystal White. Putting the colour on is the best part, it makes a HUGE difference in just a short time!
- I actually cheated a bit, & mixed up some two pack & BRUSHED it on, right down low, on the chassis rails, near the transmission, as I didnt want over spray underneath the car. You will never pick it!
- The trick is to put a light coat on first, let it go tacky, then give it a nice thick full coat, which sticks to the first tacky coat & the brush marks just flow out! If you give it the big coat first, it will run like a bastard!
- I wasnt going to do anything with the black areas where the wipers sleep, as the next project is Factory air, & I will have to pull everything out to cut the plenum chamber, but the white stuff looked so good, I just had to tidy it up.
- I stripped everything out of there, except for the heater blower, as I didnt want to break the factory seal on that baby!
- I removed all the nuts & washers, but left the bolts that come through from the inside, just masking them up.
- I then masked the whole heater box/blower assembly & sanded/cleaned down what was left.
- The colour/finish of the black area was a tough decision.
- Two pack black was too glossy, flat was too flat, satin was also too flat, so I ended up with acrylic gloss black, with a little flattening base in it to take the shine off it.
- I reckon it looks about right! I should have done the black first, then the white, as I had to mask off the white that I had already done, so the black wouldnt go onto it, (did you get it?)
- After everything had dried I pulled off all the masking to reveal that I had done a shit job! To make a long story short, I had to remove the transmission, gearshift linkages, grille, front bumper, engine mounts & transmission cooler lines to clean off the over spray.
- This took longer than the preparation & painting! Putting everything back also took ages, cause you needed to clean or paint (or both) everything first.
- Thankfully I have a sandblasting cabinet at work, so I could blast the old paint/grunge off & then paint it. After an eternity, all the stuff that needed to go back on , was back on & it was time for the motor.
- The motor had a bit of a drinking habit, oil was its thing!
- You never saw any smoke, but it would go through a litre on a trip to Sydney & back (250 km).
- I also wasnt too keen on its performance, a bit sluggish even though it was tuned perfectly.
- Had a couple of small oil leaks too.
- I stuck it on the engine stand & stripped it down.
- Engines dont faze me at all.
- I have rebuilt more engines than I care to remember.
- My last workshop used to specialize in engine repairs or replacements, bloody Sigmas, Magnas, econovan, L300, colts, they kept me in business! It wasnt long before it was stripped to bits & the obligatory cracked piston was spotted.
- Oh well, I had another three old motors to steal one from.
- The car has only done 45,000 miles so there wasnt much to get excited about inside, but I did get the block chemically cleaned so it looked brand new.
- The heads got reconditioned, a new standard camshaft & timing chain/gears (multi keyed so I can accurately set the camshaft timing to hopefully improve performance) new lifters (given to me years ago) Main & Big end bearings ( Ebay years ago) & ACL Cast rings complete the picture.
- As time was running out (8 days to go) it was time to score a piston from one of the other engines.
- I dragged the daggiest one out first, shit, the guy I got it from must have stored it in Sydney harbour. Rusted solid! I spent a couple of hours trying to get just ONE piston out, hell, there are 8 of the bloody things, but no, I couldnt shift one!
- I chucked it in the trade waste bin in disgust! (I had held on to this thing for 2 years & dragged it all over the central coast).
- Oh well drag another one out & off with the inlet valley & head
.., bloody Holden Pistons
. Grrrrrr.
- I was smarter on the next motor, I took a spark plug out & looked inside
.. Holden pistons again! Shit shit shit!!!
- I was out of engines! Lets have another look at the rusty one.
- Another two hours wasted & I was on the phone to Joe Green & he kindly donated two pistons to the cause.
- I should have rung him first!
- At least I got rid up 1 dud engine!
- The engine was soon shoved back together with all the pistons suitably modified to minimize the chance of further cracking, camshaft degreed in, & the whole shooting match was soon back at home ready to go in.
- The problem being it was Wednesday night & The car still wasnt registered & I was to take it to Sydney on Sunday, Hmmmm no room for error huh!
- God this story is going on
Im sick of writing it!
- Ok lets speed it up.
- Wednesday night, shove it in, Thursday night, finish shoving it in & fire it up.
- Friday, come home at lunch time, drag the neighbours around to help with the bonnet & drive it in for a blue slip.
- Well I thought that I had seen the end of the dramas.
- The car was running (quite well I might add), I had my blue slip & green slip & all I had to do was go to the RTA & pay my money & Im done.
- Not quite! I get to the RTA on Saturday morning & get to the counter, & I find out the dill hadnt filled in the blue slip properly & they couldnt register it! Better still, the blue slip guy wasnt open on Saturday mornings.
- I was wild! I get very cranky when I dont get enough sleep & between the Bloody Nomad & the P76 & running a workshop, I had been burning the candle at both ends for months.
- I was tired & cranky. Thankfully I kept it together, went & had a chocolate milkshake (with malt!) & thought about it a while.
- The blue slip guy also does the NRMA road service, maybe he was doing this & thats why he was closed. I made a phone call to the NRMA & sure enough I had him. We met up, he fixed up his stuff up & I was back at the RTA at 11.45am (they close at 12) Talk about cutting it fine huh!
- That afternoon I took it for a bit of a drive to make sure that all was ok, then cleaned it up (it had been in the garage for 6 months ) & put on all my underbonnet decals. It looked great!
- I got to bed at 11.45pm that night, it was also the start of daylight savings so I lost another hour, that made in 12.45am, & I had to be up at 6 in the morning for the trip to Eastern creek for the muscle car masters.
- Now you can see why I am The Worlds Most Boring Man.
- Hooray! Its bloody finished (this story, not the P76! Are they EVER finished?)
- See Ya all later
- Jason
|
| |
|
|
|
|
Last updated
Feb, 2006 |
This web site may contain Copyright material
If you find any problems with the site, please email the
Web Editor  |
|