Leyland P76 Owners 2006 |
Technical problem |
P76 Fuel Tank
Contamination and rust
Caution:- Always think "SAFETY FIRST" - disconnect the battery, no naked flames, no smoking, no little people or pets in the vacinty.
How to remove your petrol tank
- The fuel tank is situated behind the boot in between the diff and boot.
- It is held in place by eight (8) bolt head size of 3/8 inch.
- To remove the tank the best way is to place the car on a hoist, but as most people don't have a hoist at their disposal then a set of car ramps or worst case jack the car body and place the stands under the body. The later I can not comment on. I used ramps the first time but had to change the tank by placing the car on the edge of a slope.
- You need to remove as much petrol as possible.
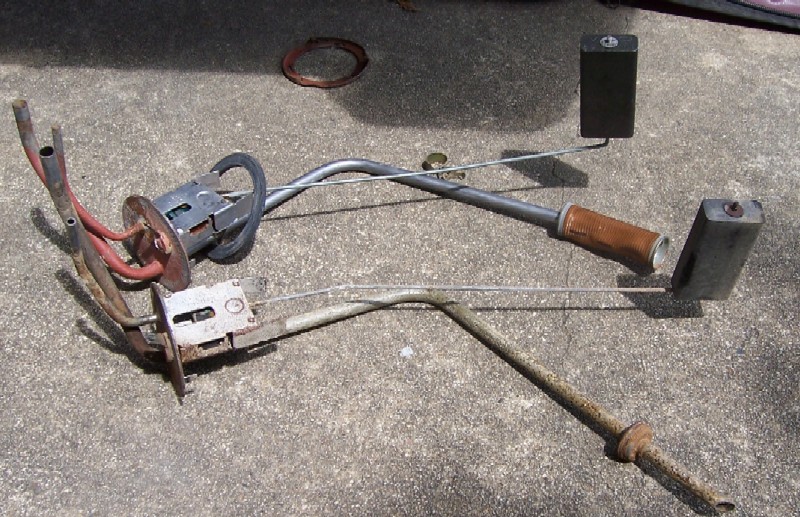
- Remove the electrical wiring by carefully pulling the female spade connection (not the wire) off the sensor unit. This cable runs behind the fuel tank back into the right rear side of the boot compartment.
- I removed the rubber pipes from the sensor unit, first by removing the clips. A combination of screw and spring steel clips. I used a pair of broad face pliers.
- (This allowed me to squeeze the ends together and move the clip down the rubber pipes.)
- The sensor unit is now accessible to allow the clip to be removed. This is done by using a drift (large flat blade screw driver and hammer an gently knock the clip anti clockwise to release the clip from under the three (3) clasps.
- Having appropriate fuel containers to capture fuel leaks gentle finish off removing the clip and remove the sensor. You will need to rotate the sensor to get the float and filter out. Don't lay under this area as fuel can be harmful if spilled on you.
- As I had little petrol in the tank I then used a syphon hose and container to remove as much of the remaining fuel before lowering the tank.
- (You may like to replace the sensor as this lessons the chance of spillage later.)
- The next step is to remove the hose clamp and clip from the tank inlets. Not easy to get to, as the exhaust pipe is in the road so bend the arm, or grab a very long flat blade screw drive and undo the clamp and the pliers again for the spring clip. (A touch is very handy at this stage).
- You will notice that the designers of the car added brackets along the top of the tank. So this makes getting the tank out and in much easier.
- You can now remove the 4 x 3/8 bolt with a socket. I used a speed brace and extension. May like to use a racket first as the two inner bolt are covered by the upper diff bracing.
- Once this is done it is only a matter removing the lower 4 screws holding the tank, sliding it to the left side of the car (ie the rubber hoses are still on the filler pipe) and removing the tank.
- (I found it easier to lay under the tank and then grabbing the sides rotating the tank to brake the bonding of the rubber hose and sliding it out from under the boot.
- I found that even though I syphoned a lot of fuel out there was still a couple of gallons left. Quite heavy.)
- The re-install you do the reverse
- The reason for removing the tank was I was suffering a lot of foreign object blocking the fuel filter. The car had sat for a long time in a shed and the petrol that remained in the tank had evaporated and growth had formed in the tank.
- Once I had the tank out I could see why I was having so much problem with the fuel supply.
- The walls of the tank were covered in rust like material as well as flakes of algae.
- My dilemma was how to remove clean the tank.
- I tried all sorts of chemicals and methods, but ended up with a high pressure spray. This was good for those area that the nozzle could reach.
- I cleaned it as best as I could only to find that rust had eaten thought the tank in the depression where the pickup nozzle sits. I found this out after re installing the tank.
- I would like to say that if you think you can fix tanks forget it. I did the unspeakable in trying to fix the tank, cleaned it with water and left half full of water and then I tried to weld up the tank the silver solder after finding that a chemical patch did not work.
- My tank hemorrhage , flames spurted out of it and the explosion re shaped the tank. I was very lucky, there was only a small smell of fuel in the tank. You need to steam clean the inside of the tank, water is not enough.
- So you still need to clean the tank, some of the suggestion are:-
- 1/ put so small nuts and bolts inside the tank and shake them around inside. Have to be careful here as the tank has a baffle inside and they may get caught in side.
- 2/ Run a hose from the exhaust of you other car into the tank with the (sensor out) not blocked wait till the fuel tank warms up and them remove the exhaust pipe hose and gentle tap the edge of the tank onto the ground (place something on the ground like carpet. Do this a number of times and then get the vacuum cleaner out and suck out the residue.
- 3/ Look in the white pages for people who clean fuel tanks.
- I ended up having to approach the club and got a brand new tank ( amazing still captivity)
Additional information
- Wed, 29 Mar 2006
- If you have to weld on the tank you must eliminate any possibility of fuel vapour.
- It could be steamed out if you have access to to this utility but then the vapours can leech out from flaking rust deposits AFTER if seems to be gas free.
- Continious flushing with water is good but leave the tank as full as possible to minimise the vapour space.
- Best method if only a couple of holes have to be repaired is to soft solder using a soldering iron NOT an oxy/acet flame.
- The temperature of the soldering iron is below the flash oint of petrol so you wont have ignition.
- regards
- Nigel
Don'ts
- Tue, 21 Mar 2006
- A friend of ours used a vacume cleaner to clean out his petrol tank and found out when the fumes hit the motor both the tank and cleaner left him standing there unhurt but a wiser man ,
- he only had to buy a new cleaner, tank and undies
- Michael
This site is hosted on
Freeservers Reliable, Free Web Hosting |
Last updated Dec, 2005 |
This web site may contain Copyright material If you find any problems with the site, please email the Web Editor  |